My Nail Growth Journey and the Best Tips and Tricks for Treating Your Nails
I've always had problematic nails. They chip and peel pretty easily which I addressed by keeping them short. For as much as I wanted to grow them out, I just couldn't figure out the best tricks to get length. I wanted to see if I could turn my nails around and, thanks to some research and putting together a great routing, I feel like I finally found products and a routine that really help my nails out.
 |
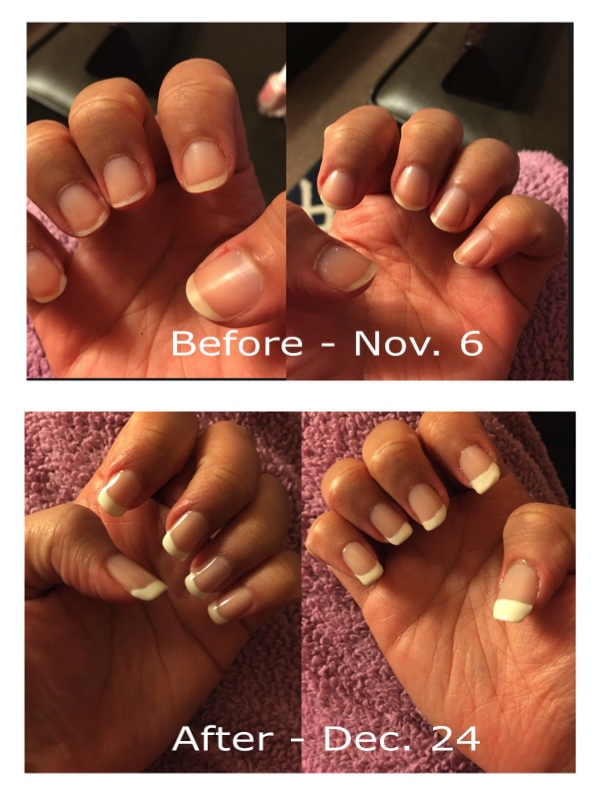
| Nov. 6 - Starting point |
Here are my nails at the starting point on November 6. My skin gets very dry in the fall and winter and my nails were certainly feeling it the most. I had peeling on my right ring and middle fingernails that I had to address.
Here's how I started treating my nails:
- I switched my nails to a rounded shape. For as much as I love square or squoval tips, a round nail shape does the best job at preventing snags and peels on nails. It's a great protective shape, particularly as I was trying to grow out damaged nails.
- I also used a sensitive grit file to file my nails in one direction. A sawing motion promotes chipping and peeling - it may be quicker, but it causes far more damage.
- I started using some new nail treatments in connection with one another. I've found the best success by using Essie's Millionails and Grow Stronger treatment base coats together. Millionails is a great treatment for peeling nails and I'd layer it with a coat of Grow Stronger, which had always worked for me to get my nails to grow. Essie recommends using both products together and I'm so pleased with my results. I also found that OPI's Nail Envy gave me good results in the beginning stages to get my nails strong again.
- I also stopped using my nails as tools. Even though I know better and love a good manicure session, I've always been willing to use my nails to scratch, peel and scrape off price stickers or crafting projects that needed readjusting. This one act alone probably made the biggest difference out of everything that I tried.
 |
| Essie Millionails, OPI Nail Envy, Essie Grow Stronger |
***
 |
| Nov. 14 - one week |
 |
| Nov. 18 - one week |
I began a routine for a week of applying my treatments and leaving them on for a few days before taking them off and reapplying. After a week, I started to see good progress on nail growth. On Nov. 14, my nails were looking much better than they had a week earlier, and by the end of the week, my nails had enough length to pull off a proper manicure.
To address the dryness in my cuticles brought on by the weather, I stepped up my cuticle and hand care.
 |
| Soap & Glory Hand Food, Nail Magic Cuticle & Hand Oil, Essie Apricot Cuticle Oil |
I've loved using Soap and Glory Hand Food to moisturize my hands and nails throughout the day. As an added measure, I got more diligent about using a good cuticle oil. My old standby, Essie Apricot Cuticle Oil, does a great job of moisturizing my cuticles and nails. I randomly came across Nail Magic Cuticle & Hand Oil on a trip to the pharmacy and decided to give it a try. It's been a great discovery - it's super moisturizing and healing with its great combination of essential oils.
Each night, I made sure to apply the cuticle oil to both my nails and cuticles and to the underside of my nails. One of the best tricks I picked up while researching tips and products was to make sure that I treated the underside of my nails as well to take complete care of my nails. After massaging the cuticle oil into my nails and cuticles, I topped off my hands with a layer of Hand Food.
 |
| Dec. 4 - one month |
One month later, I had good length to my nails. My left hand was fairing much better than my right hand which to be expected as your dominant hand will experience the most use and the better odds of damage. My nails felt strong enough to start filing them into my preferred square nail shape.
I still had some peeling on my right middle and ring fingernails to grow out. From my research I learned to avoid buffing out the damage. Buffing removes a layer of nail which is especially bad for peeling nails that are already compromised. To support nail growth and to strengthen those weakened nails in particular, I began applying a layer of Essie Grow Stronger or OPI Nail Envy to the underside of my nails. My nails were now being treated and strengthened from both sides which made them far more chip resistant.
 |
| Dec. 14 - six weeks |
 |
| Dec. 14 - six weeks |
I really started to see nail growth once I started applying treatment to both the tops and undersides of my nails. These photos are from my six-week growth point, where my nails showed visible length from the top and undersides. I'd finally reached the point with my nail growth that I needed to file them down to keep them manageable for my lifestyle! Needless to say, I was super excited.
 |
| Dec. 24 - two months |
Nearly two months after growing out my nails and I had enough length to properly shape them square. I also was able to attempt a French manicure for the first time! I'm quite proud of my nail art attempt, but I'm even prouder that I stuck with my nail growth to get them in the best shape possible. The damage on my right middle and ring fingernails is almost completely grown out. I got a lot of compliments on my nails with folks suggesting that they thought they were acrylics.
***
I hope that these tips and tricks can give you the nails you've been wanting. Leave your favorite nail growth tips and tricks or your favorite nail care product recommendations in the comments below.
I am going to follow this routine. I almost went to the nail salon in search of longer nails but then I remembered your awesome French manicure. My nails are crap so I'm going to see if this works for me. Thanks for sharing!!!
ReplyDeleteI'm so glad you've found this helpful! My nails have always been a trouble spot for me but this routine finally got them into great shape. In fact, I have to file my nails down this weekend since they've gotten a little too long since this post. Good luck with your nails! :)
Delete