Posts

Showing posts with the label Crafter's Delight

Crafter's Delight: Glitter Gift Wrap and Card
Image
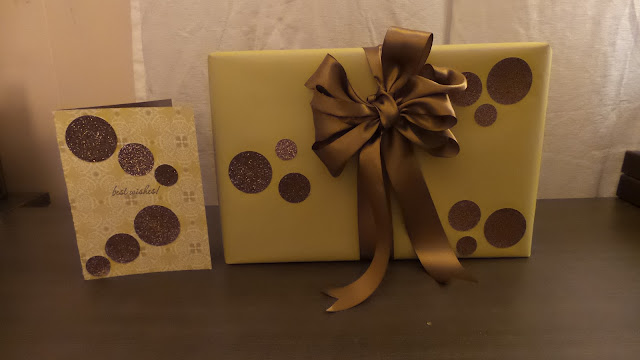
It's time for another edition of Crafter's Delight! A few weeks ago, I had a special gift to share and wanted to create a special gift wrapping presentation for it. This was super simple but high impact, and I just loved the way it turned out! Here's how I did it: From top to bottom: I started by wrapping the gift in yellow-green wrapping paper. I used a circle cutter and bronze glitter paper to cut out 1", 1.5", and 2" circles and used spray mount adhesive to secure the circles to the box. Then I took a burnished bronze ribbon and tied a massive bow with long tails. I wanted the gift to look decorated but not overly so, and I think this did the trick. For the card, I found this wonderful yellow-green and brown craft paper and secured it to brown card stock to create a sturdy card, using a bone folder to create a crisp edge. I then took my remaining bronze glitter dots and secured them to the outside of the card. A simple mess...
Crafter's Delight: 2017 Christmas Gift Wrap and Cards

Image
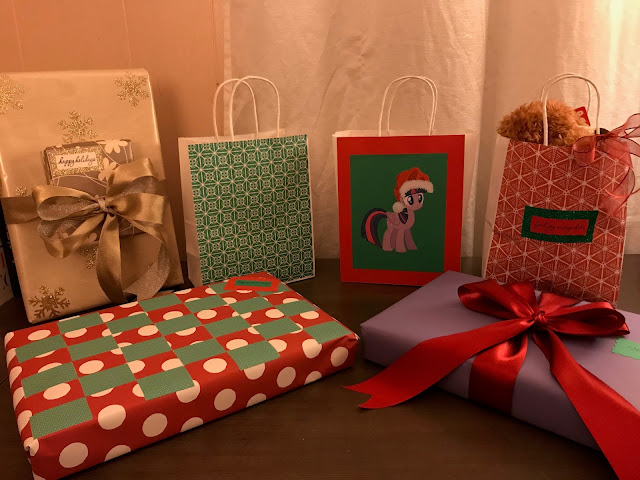
The holiday season is crafting season! I so enjoy gift wrapping and card making and Christmas time is a fabulous time to get even more festive and indulge in my crafting obsession. Last year I shared my wrapped gifts and I'm making it a tradition! But first, I'll start with making my own holiday cards. I used my iPad Pro and the Amaziograph app to create my own holiday-themed designs. I then loaded the graphics onto my computer and printed them out on sticker paper. I used edging scissors, card stock and some holiday stamps to create a sweet holiday message on the outside of the card. I then laid the sticker paper onto white card stock, folded the cards in half and voila! Homemade holiday cards! And on to mail the cards! First, I took two pieces of 8.5x11" card stock and used my card as a guide to see how best to create the envelope flaps by lightly folding the top piece of card stock. I used an adhesive dot roller to secure the ...

Crafter's Delight: Stranger Things Gift Wrap and Card

Image
Calling all Stranger Things fans! I recently put togther a Stranger Things-themed gift wrapping job for a friend's birthday and I'm super excited with how it all turned out! Here's how I pulled it off: The Card: To make the card, I found a website that allows you to make your own Stranger Things-fonted messages, and I downloaded that image into a new Microsoft Word file.   I then printed a picutre of the Upside Down and my birthday message onto sticker paper, then mounted the sticker paper onto card stock. Here's the back of the card pulled together. For the inside of the card, I printed a picture of Dustin - my friend's favorite character - and mounted it onto a card stock spring that I made by folding a small, thick piece of card stock into an accordion. This way, Dustin pops up when you open the card. I then hand wrote a birthday message.   The Gift: I started by wrapping my gift in red gift wrap to coordinate with the red card s...

Crafter's Delight: How To Make Your Own Planner Dividers!

Image
Earlier this month, I shared how much I've been enjoying my Kate Spade planner to keep myself organized. My only knock on the planner was that it didn't come with dividers to separate the months to make planning even easier. I searched high and low for dividers that I'd like but I realized that the only way to get what I was looking for was to craft it out! This was such a fun crafting project and I am so happy with the end result. Here's how I customized my planner to make it even more functional. Get ready to measure! I had the perfect book of crafting paper to create a black/white/grey/gold color palette for my planner. I cut fourteen pieces of card stock down to the size of my planner by using an original insert as a template. I toyed around with making tabs to create more traditional dividers but I actually preferred going without it. I then laid out my dividers in the order that I wanted to place them in my planner. Time to make the lab...

Crafter's Delight: Purple Flower Garden Gift Wrap

Image
I'm back with another crafting project! I have a present for my little cousin and I wanted to do something special - it would be youthful for an 8 year old but also a little grown up so that she can feel extra special. I got inspired by multiple shades of purple and came up with this gift wrap design. Here's how I did it. First, I started by wrapping the box in plain lavender gift wrap paper.  The color was so fun that it inspired me to work with multiple shades of purple to create something really special and to play with a tone-on-tone design. This was my purple palette. I grabbed multiple shades of purple card stock and some glitter paper to run the full range of pinky-purples. From there, I got inspired to create a purple flower garden theme. I used this decorative punch to make a string of flower petals. I then used an adhesive dot roller and coated the very bottom of the petals and proceeded to roll the petals in a circle to make the beginning ...