Posts

Showing posts with the label Crafting

Crafter's Delight: Glitter Gift Wrap and Card

Image
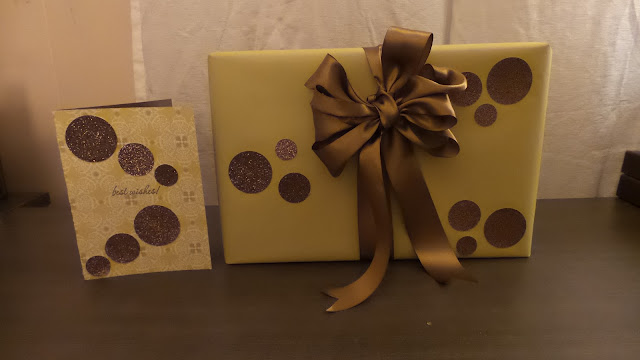
It's time for another edition of Crafter's Delight! A few weeks ago, I had a special gift to share and wanted to create a special gift wrapping presentation for it. This was super simple but high impact, and I just loved the way it turned out! Here's how I did it: From top to bottom: I started by wrapping the gift in yellow-green wrapping paper. I used a circle cutter and bronze glitter paper to cut out 1", 1.5", and 2" circles and used spray mount adhesive to secure the circles to the box. Then I took a burnished bronze ribbon and tied a massive bow with long tails. I wanted the gift to look decorated but not overly so, and I think this did the trick. For the card, I found this wonderful yellow-green and brown craft paper and secured it to brown card stock to create a sturdy card, using a bone folder to create a crisp edge. I then took my remaining bronze glitter dots and secured them to the outside of the card. A simple mess...

Crafter's Delight: 2017 Christmas Gift Wrap and Cards

Image
The holiday season is crafting season! I so enjoy gift wrapping and card making and Christmas time is a fabulous time to get even more festive and indulge in my crafting obsession. Last year I shared my wrapped gifts and I'm making it a tradition! But first, I'll start with making my own holiday cards. I used my iPad Pro and the Amaziograph app to create my own holiday-themed designs. I then loaded the graphics onto my computer and printed them out on sticker paper. I used edging scissors, card stock and some holiday stamps to create a sweet holiday message on the outside of the card. I then laid the sticker paper onto white card stock, folded the cards in half and voila! Homemade holiday cards! And on to mail the cards! First, I took two pieces of 8.5x11" card stock and used my card as a guide to see how best to create the envelope flaps by lightly folding the top piece of card stock. I used an adhesive dot roller to secure the ...

Crafter's Delight: How To Make Your Own Planner Dividers!

Image
Earlier this month, I shared how much I've been enjoying my Kate Spade planner to keep myself organized. My only knock on the planner was that it didn't come with dividers to separate the months to make planning even easier. I searched high and low for dividers that I'd like but I realized that the only way to get what I was looking for was to craft it out! This was such a fun crafting project and I am so happy with the end result. Here's how I customized my planner to make it even more functional. Get ready to measure! I had the perfect book of crafting paper to create a black/white/grey/gold color palette for my planner. I cut fourteen pieces of card stock down to the size of my planner by using an original insert as a template. I toyed around with making tabs to create more traditional dividers but I actually preferred going without it. I then laid out my dividers in the order that I wanted to place them in my planner. Time to make the lab...

Crafter's Delight: Panda Birthday Card

Image
How do you surprise someone who loves pandas for their birthday? You make them a glittery panda birthday card! Here's how I made it: First, I used a bone folder to create the perfect crease on a 12 x 12-inch piece of white card stock. My plan was to size the card stock down to size and use the leftover paper to create the other shapes I needed. I then layered silver glitter paper onto the card stock. I used a spray adhesive to securely bind the card stock and glitter paper to each other - it dries very quickly and doesn't bubble up, leaving a smooth finish on each layer of paper. I placed the card stock under paperweights while the glue dried down. I then used a paper cutter to cut the card down to size and eliminate any white edges of the card stock showing through.   I used a circle cutter to cut a 4-inch white circle for the panda's face. I then cut a single 2-inch black circle which I then cut in half and two one-inch circles to create the ...

Chewbacca Gift Wrapping

Image
Another special gift wrapping edition! I've got a Star Wars-loving friend with a birthday coming up, so I went with a full Chewbacca theme for the gift wrap job. Here's how I did it: The Gift Bag As usual, I turned to Google Images to find a cartoon version of Chewbacca that I really liked. I spent some time creating a grid of the image which I used to create a layered background for a gift bag. I mounted the Chewie image onto bronze glitter paper. I used some coordinating orange card stock and a stamper to create the perfect birthday wish note! I used a brown ultra fine tip Sharpie to bring out the lettering a bit more. Once the image was complete, I mounted it onto a brown gift bag. I finished the package off with some bronze ribbon that I tied into a bow on the handle. I finished the edges of the ribbon by folding each tail in half and cutting upward on a 45 degree angle to create a triangle cutout. The Card I love coordinating cards t...

Batman the Animated Series Gift Wrapping

Image
A Sunday crafting session...there's no better way to spend the day in my book! I have a Batman fan of a friend who's got an upcoming birthday and I wanted to do something really special. Here's how I did it. I started by wrapping the gift itself in plain blue paper. I then searched Google Images to find some great high resolution images from the 90's era of Batman The Animated Series.  I found this super cool photo of Batman with lightening bolts behind him and loved the way he towered over the city from his perch. I played with sizing and perspective a bit until I got everything at the right size. I printed two copies on card stock and, after sandwiching two pieces of heavy card stock at the base of the photos, pasted them back to back. The picture was then placed them under paperweights to keep the hold. I then found this cool collage of Batman's foes and spent some time sizing it so that each square would be roughly 4 cm to create a checkerboard...