Posts

Showing posts from December, 2016

My Nail Growth Journey and the Best Tips and Tricks for Treating Your Nails

Image
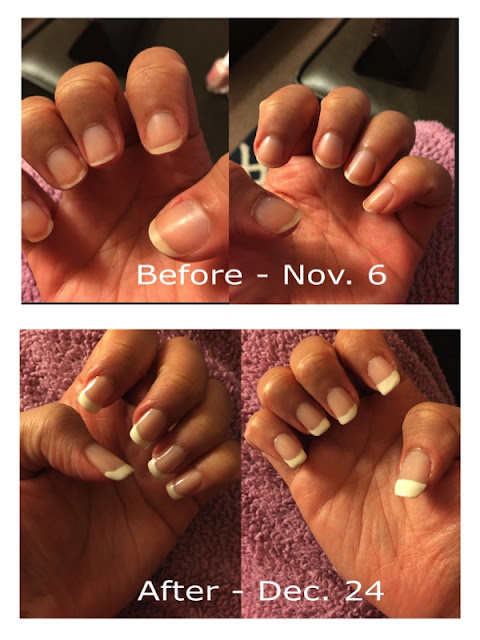
I've always had problematic nails. They chip and peel pretty easily which I addressed by keeping them short. For as much as I wanted to grow them out, I just couldn't figure out the best tricks to get length. I wanted to see if I could turn my nails around and, thanks to some research and putting together a great routing, I feel like I finally found products and a routine that really help my nails out.  Nov. 6 - Starting point Here are my nails at the starting point on November 6. My skin gets very dry in the fall and winter and my nails were certainly feeling it the most. I had peeling on my right ring and middle fingernails that I had to address. Here's how I started treating my nails: - I switched my nails to a rounded shape. For as much as I love square or squoval tips, a round nail shape does the best job at preventing snags and peels on nails. It's a great protective shape, particularly as I was trying to grow out damaged nails. ...

Holiday 2016 Gift Wrapping!

Image
Gift wrapping projects are my favorite crafting projects! I so enjoy picking out gifts for loved ones and wrapping them up to make them all the more special. I think this year's holiday present recipients will get a kick of the gifts they're getting and the beautiful packaging. The Stuffed Animal There aren't too many ways to wrap up a stuffed animal, but I think a festive bow can really create a thoughtful presentation moment. I made a large bow around this little kitty's neck with some metallic fabric ribbon.  If you can tie a shoe, you can tie a bow like this. Tie a large bow and tighten the knot so the bow is secure. Then make another bow using the first one as a guide for how to properly shape the loops of the bow. Once you've completed the bows, take the longer side of the tail and wrap it around the knots to hide them. Secure the tail with a single tie (not a knot) and the bow will be perfectly secure until it's time to remove the bow, whic...

Quick Take: Easy Gift Packaging for Baked Goods

Image
I love giving away baked good as gifts. It's a low-impact gift to prepare that has high impact for the person receiving it. Today I decided to make a batch of brownies to give away as a gift. And since I love gift wrap so much, I wanted to give it a little extra special touch with the packaging. The photo above are all the tools I used to create the special gift packaging, and as you can see, it's quite simple. I purchase cellophane bags from Target and use some yarn, card stock, decorative edging scissors, and a metallic marker to bring it all together. First, I made my thank you note. I used two different edging scissors to cut my card stock and nest them together. A simple glue stick does the trick. I used my metallic Sharpie to write a quick note of thanks on the card. Once dry, I used a hole puncher to create a hole for the yarn to go through to affix the card to the package. I placed the brownies inside the bag and tied the yarn and note around th...